Create
your own FROGGER Game!
Lesson
1: Making your Character Work.
|
1.1 Setting
up your character. First,
we’re going to make a character that needs to move across the screen. Create
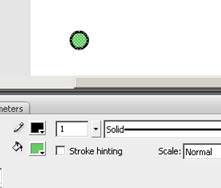
a circle using the circle tool. For best results, make it about the size of a
fingernail. Once
you’ve made the circle, right-click on it, Convert to Symbol... and make it a
Movie Clip. All of your ‘characters’
in your game will be Movie Clips. |
|
|
1.2 Making
your character move. Next,
we’re going to give our character ActionScript so it can move across the
screen. Right-click on our character
and select Actions. The ActionScript
window will appear. In it, type the following: Test your
movie by hitting CTRL-ENTER and you’ll notice that it will move RIGHT by
pressing the right cursor! This is because it’s set to move the x-coordinate
2 pixels when the right cursor key is down! |
|
|
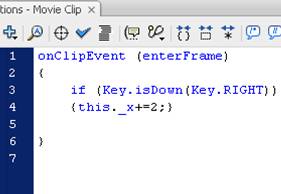
1.2 Make it
move all over! Now that it moves to the right, add more ActionScript to it so it can move in all four directions. In the ActionScript of our character, add more lines of code to include the other x- and y-coordinates. Type in the bold text into the Script: |
onClipEvent
(enterFrame) { if (Key.isDown(Key.RIGHT)) {this._x+=2;} if (Key.isDown(Key.LEFT)) {this._x-=2;} if (Key.isDown(Key.UP)) {this._y-=2;} if (Key.isDown(Key.DOWN)) {this._y+=2;} } |
Lesson
2: Making the Game End
(For better or for worse!)
|
2.1 Setting up
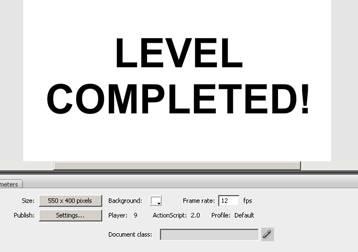
a “LEVEL COMPLETED” screen. Let’s
create two screens: One screen that says LEVEL COMPLETED, and another that
reads GAME OVER. First, right-click on
frames 2 and 3 at the top on the Timeline and Insert Blank Keyframe on each
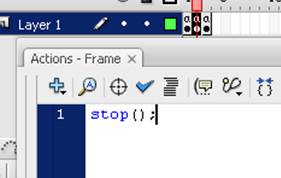
of those. On all three frames, go into the ActionScript (by right-clicking on
each frame and selecting Actions) and add a stop(); to each frame. This will prevent
the game from moving on to the next screen. |
|
|
2.2 Creating
the two screens. On each
screen, use the text tool to create “LEVEL COMPLETED” on Frame 2 and “GAME
OVER” on Frame 3. *Remember that these
screens don’t have to be super cool right now… You can always go back later
and “artsy” them up! |
|
|
2.3 Make the
character win! Now that
it moves around, let’s allow the character to ‘win’ the level by reaching the
top. In this case, it the y-coordinate of the character is less than 30, it
will go on to the next screen – the LEVEL COMPLETED screen. In the ActionScript for the character (which is on Frame 1), add the following bold line to the ActionScript: |
onClipEvent
(enterFrame) { if (Key.isDown(Key.RIGHT)) {this._x+=2;} if
(Key.isDown(Key.LEFT)) {this._x-=2;} if (Key.isDown(Key.UP)) {this._y-=2;} if (Key.isDown(Key.DOWN)) {this._y+=2;} if
(this._y<30) {_root.nextFrame();} } |
Lesson
3: Creating Traffic (and ‘hit tests’)
|
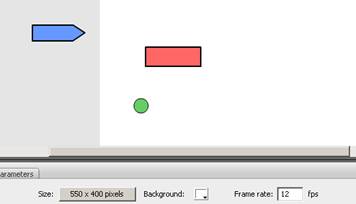
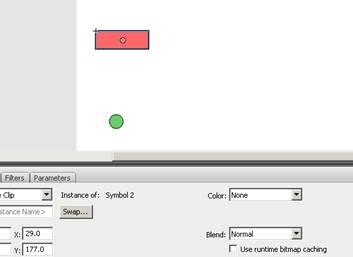
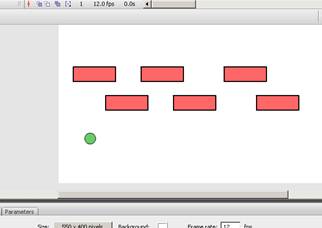
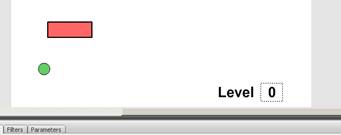
3.1 Make a
truck. Create a
rectangle that will be used as our semi truck. Once you’ve made the
rectangle, convert it to a Movie Clip. Next, go
into the ActionScript of the truck to make it move to the right. In English,
we’ll make it reset the x-coordinate to -100 if the truck reaches a coordinate
of 500: onClipEvent (enterFrame) {
this._x+=5; if (this._x>500) {this._x=-100;} } |
|
|
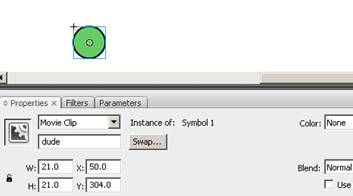
3.2 Naming our
‘dude’. In terms
of using Flash, a ‘hit Test’ occurs when one Movie Clip touches or collides
with another. In order for us to make hitTests,
we need to create an instance name for our character (which is just a name to
use as a reference)… Select
your character (but don’t double-click) and, in the properties window, type dude in left box for the <instance
name>… |
|
|
3.3 Name
your Frame. We’re now going to rename our third frame to ‘gameover’. The reason for this is simple: We can always tell Flash to ‘gotoAndPlay’ frame 3, but later on, we’re going to add extra frames in the beginning, which would cause us to have to go back and change all of our frame numbers! By ‘naming’ that specific frame, we can refer to it any place in the program – no matter if we add frames or not. Make sure the Properties window is up, and click on the 3rd frame on the timeline. Change the name of the 3rd frame in the properties window to gameover. |
|

|
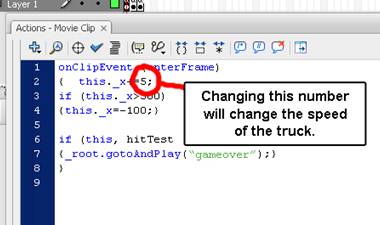
4.1 Check
for a collision. Now that
our truck is moving, we need to see if it makes contact with our dude Movie Clip. In the ActionScript
for the truck, add the following bold
text. (*Note: You do not need to
name your truck like you did your dude.) |
{ this._x+=5; if
(this._x>500) {this._x=-100;} if (this, hitTest
(_root.dude)) {_root.gotoAndPlay(“gameover”);} } |
|
4.2 Increasing
traffic. Congratulations! Our ‘truck’ seems to be working just
fine. Let’s make this game a lot more
difficult by adding MORE trucks. This
part is easy: Simply copy and paste
the truck in various places. (Another method is to hold the ALT key and drag
the truck – it will make a duplicate of the truck.) |
|
|
4.3 Changing
speeds. Since
most cars and trucks don’t travel at the same speed, you will want to make
one lane go faster (or slower) than the others. (This also makes the game a lot trickier,
too!) Simply change the speed of the
trucks by adjusting the number ‘5’ in the ActionScript of those trucks. (*NOTE: If you change the speeds (which is recommended), change the speed for an entire ROW of cars! If you have trucks of various speeds in the same row, one truck will eventually run over another!) |
|
Lesson
5: Taking FROGGER to New Levels!
|
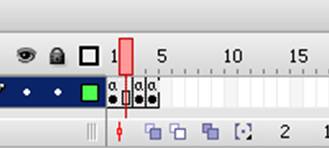
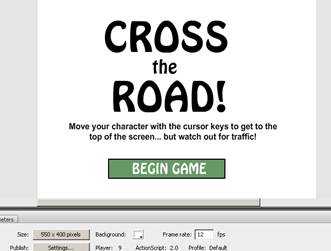
5.1 Making a
title screen. Creating
a title screen is more than just putting a cool intro to your game: It holds
the LEVEL variable to start each game at level one. On the timeline, right-click on Frame 1 INSERT FRAME. The timeline should now look like the image to the right, and it should’ve duplicated all of the Movie Clips on that Frame as well. |
|
|
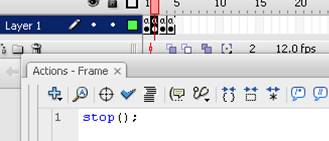
5.2 Convert to
a Keyframe. Next, we
have to convert Frame 2 to a regular keyframe so we can add ActionScript.
Right-click on Frame 2 and CONVERT TO KEYFRAMES. You will also need to put a stop(); in the ActionScript for Frame 2 so it doesn’t immediately move on the
next frame. If done
correctly, the Timeline looks like this: |
|
|
5.3 Make
Frame 1 a Title Screen! Frame 1
will now be a title screen instead of the game. All we have to do is delete
the items on that Frame. (Don’t worry – your Movie Clips for your game should
still be on Frame 2.) Once
you’ve deleted the Movie Clips from the stage, make a simple title screen. As
always, you can go back later and make it more ‘artsy’. Also, make an image to BEGIN the game. We’ll make it into a Movie Clip on the next step. |
|
|
5.4 Make a
‘Begin Game’ button. Select
the area that you made as a ‘Begin Game’ Movie Clip. (Be sure to select both
the rectangle and the text.)
Right-click and Convert to Symbol. Make it a Movie Clip as usual. In its ActionScript, just add the following
on the right. Since the game is the
NEXT frame after the title screen, this will work. |
on (press) {_root.nextFrame();} |
|
5.5 Make new
variables. Go to the
ActionScript for Frame 1 and add the two following lines: level will simply
tell what level we’re on, but speed will eventually be set up to increase as
each level is completed. |
var level=1; var speed=2; stop(); |
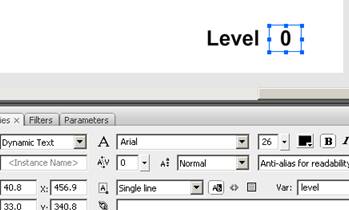
5.6 Showing
the level in the game. Go to your game frame (Frame 2) and put two text boxes someplace on the screen (I recommended the bottom right). One text box should say “Level”. Make that text box STATIC TEXT in the Properties because the text never changes. However, make ANOTHER text box with a 0 in it and make it DYNAMIC text because we’re going to put a variable in there. Once you change the properties to ‘Dynamic Text’, you’ll need to enter level in the box that reads Var: … See the image on the right. |
|
|
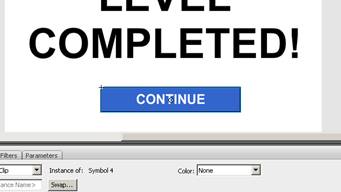
5.7 Create a
‘CONTINUE’ button. Create a
Movie Clip on Frame 3 (the LEVEL COMPLETED screen) to read ‘Continue’ or ‘Go
to Next Level’. Once it’s a Movie
Clip, add the following actions: on (press) { _root.level+=1; _root.gotoAndPlay(2); } This will
make the level go up by 1, then go back to the game. |
|
|
5.8 Make an
adjustable speed. Right now, no matter how many times you complete a level, it will stay and the same speed and not get any more difficult. Let’s change that! In order to do this, delete all of the trucks on the game screen EXCEPT ONE! |
|
|
Go into
the ActionScript for the truck and change the speed. This is done by changing
the number that is added to the x-coordinate. Change the 5 on the second line
to the bold code here: You may
notice at first that the cars go MUCH slower than before. This is because we set the original value
of speed for only 2 – BUT it’s about to get faster! |
onClipEvent
(enterFrame) { this._x+=_root.speed; if
(this._x>500) {this._x=-100;} if (this, hitTest
(_root.dude)) {_root.gotoAndPlay("gameover");} } ();} |
5.9 Increasing
the speed. Go back to your LEVEL COMPLETED screen and open the Movie Clip that says ‘Continue’ (or whatever you made it)… Just add a line of code that increases the speed of the trucks before it goes back to the game. See the bold code to the right. |
on
(press) { _root.speed+=1; _root.level+=1; _root.gotoAndPlay(2); } |
|
6.0 Create a
‘PLAY AGAIN’ button. Finally,
create a Movie Clip on Frame 4 (the GAME OVER screen) to read ‘Play Again’. Once it’s a Movie Clip, add the following
actions: on (press) { _root.gotoAndPlay(1); } Notice
that this will take it back to very beginning of the game and reset the
variables! Also,
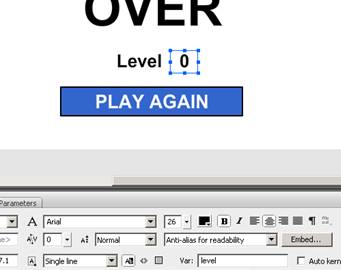
it’s very helpful to copy and paste the two text boxes for the level from the game screen to this
one. (As shown to the right). That way, a player can see how well they did
when the games ends! |
|
|
BONUS – Creating Special Trucks! Just to
make things interesting, let’s create a character that you will only see
AFTER the second level! This truck
will also go a little faster than the rest of them! To begin,
make a separate Movie Clip that’s placed OFF STAGE to the left. This way, when the game begins, we don’t
see it. |
|
|
Next, go
into the ActionScript for the ‘special’ truck and change the speed. This is
done by changing the number that is added to the x-coordinate. Change the 5
on the second line to the bold code
here: Also, we
want to have it move ONLY IF THE LEVEL IS GREATER THAN 2. Add the bold code
shown. (Don’t forget to add that extra
bracket, too!) |
onClipEvent
(enterFrame) { if
(_root.level>2) { this._x+=_root.speed+2; if
(this._x>500) {this._x=-100;}
} if
(this, hitTest (_root.dude)) {_root.gotoAndPlay("gameover");} }
|